Total Pageviews

Saturday 11 June 2016

How to Get Windows OS Tab Button Functionality in Mac OS

I am a kind of person who uses Keyboard more than Mouse. I have been using Mac OS from the last 4 Years and it's a very bad problem with Mac OS that you have to use mouse a lot more than you use mouse in Windows OS. 

For a Lot of Purposes I always wanted to Do things with Keyboard all the time. 

Here is the Problem in the Below image.


To Discard this document or to Cancel this popup option, I have to use Mouse, Tab Can't be used here (By Default by Mac OS).

So this is a very bad Functionality that I don't like, so here is a tutorial to do anything and Everything on this Popup option menu or any other menu using just your Keyboard.

Steps to Get Windows OS Tab Button Functionality in Mac OS: -

1) Open up System Preferences in you Mac OS.


2) Click on Keyboard and it will take you to a new Tab.


3) From the Tab Menu select the Shortcuts and select the All controls toggle button and it's Done

4) Now Let's Test it out, open Textedit and write anything in it and press cmd + Q, now a dialog box will appear with different options, like Don't save, Cancel, Save, by Default it will be on Save, you can tap on Tab Button to see it it works? does it go to other options? If yes you can execute those options by pressing Space Bar Key.


NOTE : IF THIS DOES NOT WORK, YOU CAN RESTART THE MAC, MAYBE THAT WILL WORK FOR YOU


Thursday 9 June 2016

How to Stop Chrome from Prompting to Saving Passwords

This a very good trick if you don't want to save any passwords in your browser.

Steps to Disable Chrome from Prompting to Save Passwords:

1) Open Google Chrome and go to Settings.


2) There will be a button at the bottom of the page Show Advanced Settings, click on that.
3) Under Passwords and Forms there will be an option Offer to save your web passwords, Untick that.


Also Learn How to Save Passwords Automatically without Prompting

NOTE : RESTART THE BROWSER AFTER FOLLOWING THE ABOVE STEPS.


How to Save Chrome Browser Passwords Automatically

This is very good trick to get somebodies password, like Facebook, Twitter or other Passwords. 

NOTE : THIS ARTICLE IS FOR EDUCATIONAL PURPOSES, DON'T DO THIS TO HARM ANYBODY. I WILL NOT BE RESPONSIBLE FOR ANYTHING HAPPEND BY YOU OR TO YOU.

Steps to save Passwords Automatically: -

1) Open Chrome browser and in the Address Bar write chrome://flags/ and hit Enter.


2) Hit Ctrl + F or Cmd + F and type Save Passwords in the search box.


3) It will be Default by default, change it to Enabled and it will never ask for to save passwords, as it will automatically save all the passwords without prompting.

Also Learn How to Stop Chrome from Prompting to Save Passwords.

NOTE : RESTART IS REQUIRED AFTER FOLLOWING THE ABOVE STEPS.


Wednesday 8 June 2016

How to Download Any Video/Audio from any Website

This is an awesome trick which will help you to download any video/audio from any web site, this trick is tested on Windows and Mac OS. 

By just clicking on one button you will download videos from any web site. 

More than 30 websites are tested, and it worked on every single one.

Steps to Download Videos : -

1) Download and Install Torch Browser.

2) It will automatically detect the OS and it will download it according to that.

3) Torch does not support Mac OS, but you can still download it.

4) Open any website (like : YouTube).

5) Click on any video that you want to download and let it load a little bit (like 2-3 seconds).

6) In the Top Right Corner you will see a button.


7) The Download button will look something like the above image (Video text).

8) Click on the button and the video will start downloading.

NOTE : THIS TRICK WILL WORK ON 99% OF THE WEBSITES, IF NOT, TELL ME THROUGH COMMENTS.


Tuesday 7 June 2016

How to Get FREE PSN+ 14 days Trial in Less than 2 Minutes

I have been trying to buy PSN+ from my credit card but the PSN was not accepting my Credit Card nor my International Debit Card, so I used my friends card but no luck, so in the end i thought lets get the FREE 14 Days trial, and I tried my Card and it worked, they credited Rs 10/- from my bank account and then instantly debited Rs 10/- back into my account. 

But what will happen after 14 days? Do I have to create another account and then verify it and purchase it?

Its a very long way, first Create an email ID on Google/yahoo/hotmail and then verify that email address u created and then using that email address create PSN ID and then verify it!!!!

That a very Long process and a lot of webpages you have to open, a lot of tabs. Its not good.

So here is the Guide to Create --->>> Verify your PSN email ID in just 20 Secons: -  

1) Open PlayStation Sign Up Page. 

2) Open 20MinuteMail

3) Create any Email with just 1 click on 20MinuteMail (It will automatically destroy after 20 Minutes).


4) Copy/Paste the Email Address on PSN SignUp Page.


5) Fill all the other details as you wish on PSN Sign up Page. After you sign up, you will be redirected to Verification Page.


6) After you click on Sign Up, you will receive an Email Address to Verify on the 20MinuteMail


7) Click on the PlayStation Network Email and Verify it.

8) Now you logIn to Playstation Network and Purchase FREE 

14 Days Trail using your credit/International debit card.

To Subscribe to 14 Days Free Trial, Watch the video.


NOTE : YOU CAN USE ANY CARD YOU WANT, THE 14 DAYS TRIAL WILL ONLY DEDUCT SOME MONEY TO VERIFY THAT YOUR BANK ACCOUNT EXISTS, IT WILL IMMEDIATELY SEND YOUR MONEY TO YOUR BANK, AS YOU WILL ALSO RECEIVE A MESSAGE OF THAT ON YOUR PHONE(IF YOU HAVE CONNECTED YOUR PHONE TO BANK)

NOTE : IF YOU ARE GETTING AN  wc-35442-8 ERROR THE USE A DIFFRENT CREDIT/DEBIT CARD.


Monday 6 June 2016

How to Remove Arrows from Shortcut Icons from Desktop

I just started using Windows OS and its really not cool to have these Arrows on desktop icons. All my Games and Softwares I use have this ugly Arrow at the left bottom corner and its not good. I always wanted to have my own customized desktop, So I thought it will be a good idea to make an Article on this. This trick will work for Windows 7, 8, 10.

Steps to Remove Arrow from Shortcut Icons on Desktop: -

1) Click on Windows button on your keyboard and Type regedit.

2) Registry Edition will appear.

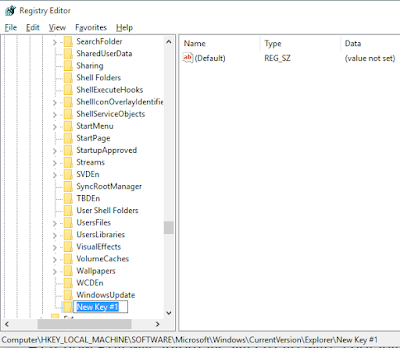
3) Navigate to :- 
HKEY_LOCAL_MACHINE\SOFTWARE\Microsoft\Windows\CurrentVersion\Explorer

4) Right Click on Explorer and go to New and then Click on Key.

5) A new Key will automatically create with a default name of New Key #1.


6) Change the name from New Key #1 to Shell Icons.

7) Right click on Shell Icons (the Key you just Created) and go to New and click on String Value.


8) You will see a new String Value has been created, Rename it to 29 and then double click on it.

9) In Value data copy/paste %windir%\System32\shell32.dll,-50 and click on OK.


10) Restart your PC and you can then see the changes.

NOTE : YOU CAN UNDO THIS ACTION BY JUST DELETING THE KEY YOU CREATED AND RESTARTING YOUR PC AFTER THAT. 

NOTE : THE REGISTRY EDITOR IS VERY PRECIOUS DO NOT CHANGE ANYTHING ELSE OR YOU CAN DESTROY YOUR WINDOWS.


How to Stop/Turn Off Windows 10 Updates

I have been using Mac OS from last 4 years and never have I ever got into a problem of Updating my OS or Softwares that I use. Then one day I thought it would be a good idea to write an article on some windows tweaks so I turn on my Laptop in which I have installed Windows 10 and realized I couldn't be able to open even one Webpage, I restarted my Internet connection but no luck. Then I checked windows updates and its all here, all my speed is using to update windows softwares that I don't even use. So I thought it would be good idea to make an Article on this topic.

Steps to Stop/Turn Off Updates: -

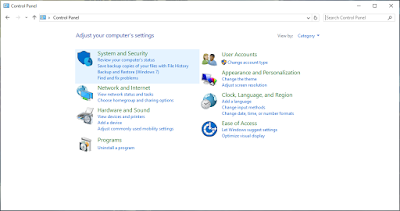
A) Navigate to Control Panel --->>> System and Security --->>> Administrative Tools.


B) Open Services under Administrative Tools Windows.


C) Find Windows Update (It will be on the eleventh from the below Items). and Open it.


D) A popup will appear. Under Service Status click on Stop.


E) And Change the Startup type to Disabled. 

F) The click on Ok, and you are Done.

G) You will receive a warning or notification from Microsoft that there is a problem downloading the updates. Just ignore it. If you Don't receive any notification or warning that is not a problem.

H) You can Turn On the Updates from the same place, just follow the steps till (C) and click on Start and Ok the changes.


Thursday 2 June 2016

How to Beat Spam Websites/eMails, Create and Verify eMail Address in 20 Seconds.

There are a lot of websites which asks for signup and you don't know if it actually does what you want or just send spam eMails in your regular eMail address. 

There is an answer to those Websites.


A) Click on the 10MinuteMail or 20MinuteMail and it will generate an eMail address that will only be valid for 10 Minutes. 


B) Lets Test this on www.4shared.com, open this Website and fill the SignUp form.


C) In Email Address type the eMail Address 10MinuteMail Provided you, other details as you wish, and click on Sign up.

D) You will Receive an eMail from 4Shared to verify the eMail Address. (This message will be delivered to 10MinuteMail website, Click on the message before the eMail gets expired).


E) Click on the message and verify the eMail Address as you could have done from any other eMail service provider (google, yahoo, hotmail), but now they will never be able to send any spam to your regular eMail Addresses.

NOTE : YOU CAN ALSO EXTEND THE TIME BY CLICKING ON "GIVE ME 10 MORE MINUTES" UNDER THE EMAIL ADDRESS THEY HAVE GIVEN YOU.

             
Related Posts Plugin for WordPress, Blogger...